Setup steps (shared by both workflows)¶
4.1 Select features¶
Menu: Extensions → SP Classify → Select Features...
QuPath cell-detection panels (COMET, MIBI, IMC, CODEX) often produce 1000–2000 measurement columns per cell. Pick the subset to use for training. Unticked features are not used.
- Filter: box — case-insensitive text search. Groups that contain a match open automatically.
- Grouped checkbox tree — features are listed in collapsible groups (below). Tick a group's box to tick or untick every feature in it.
- Select All / Clear All — tick or untick every feature currently shown by the filter.
- Expand All / Collapse All — open or close every group.
- Tick or untick a row to change one feature.
- The counter at the bottom shows
X / Y selected.
There is one group per marker (the text before the first :, e.g. DAPI_AF), followed by these groups:
- Morphology / Shape — compartment-only measurements (
Cell: Area µm^2,Nucleus: Circularity, …). - Neighbors — neighbour-aggregate features (
Neighbors: Mean: …). Labels keep theNeighbors:prefix. - Embeddings — dimensionality-reduction and embedding columns: UMAP, PCA, t-SNE, and
*_emb_*names (e.g.kronos_emb_0). - Other / Uncategorized — features that fit none of the groups above.
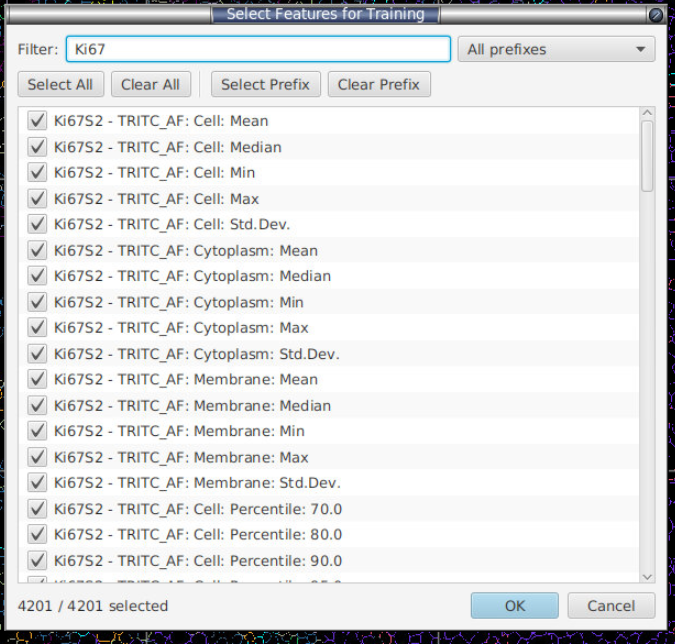
Do you need to remove features by hand? Usually not. Extra or near-duplicate features rarely lower accuracy with the default models, but they make training slower and split a marker's importance across several columns in the feature-importance plot. Leave Auto-prune features ticked to remove them automatically.
Auto-prune features (drop near-constant & redundant) is ticked by default (§14). At the start of each training run it removes features from that run's feature list. It does not delete or change measurements. The decision uses raw values from your labelled cells on the open image, plus labelled cells from other images when Pool labels from all images is ticked. Rows imported from CSV are trained on but not used for the decision. Pruning is skipped if there are fewer than 10 labelled cells. It works in four steps:
- Constant features — removes a feature that is non-zero in fewer than 5 cells or has zero variance.
- Duplicates within a marker — within each marker group, keeps the feature with the highest variance and removes any feature whose absolute Pearson correlation with a kept feature is above 0.95. For example,
CD3: Cell: Mean,CD3: Cell: MedianandCD3: Cell: Maxbecome one column. - Duplicates across markers — not removed. Features from two different markers are never merged, even when they are correlated.
- Minimum kept per marker — the 5 highest-variance features in each group are always kept, so every marker keeps at least 5 features (or all of them if it has 5 or fewer).
Marker groups for pruning: a feature's group is the text before the first
:(CD3: Cell: Mean→ CD3). If there is no:, the group is the text before the first underscore or space (kronos_emb_0→ kronos,Distance to tumor→ distance). Case is ignored. These groups are not the same as the Morphology / Neighbors / Embeddings groups in the feature picker.
Your selection is saved in <project>/celltune/classifier-state.json and is kept between QuPath sessions.
4.2 Clustering normalisation¶
Menu: Extensions → SP Classify → Clustering Normalisation
These transforms are used only by clustering, the scatter plot and gating (§11). The classifier always uses raw values. The window has a Filter: search box, a prefix dropdown with Select Prefix / Clear Prefix, Select All / Clear All, and:
- Transform: dropdown:
- arcsinh —
arcsinh(x / cofactor). Recommended. Set Cofactor: (default 1.0) for your data, or click Suggest… to open a tool that estimates a cofactor from the background level of features you choose.- Raw fluorescence (COMET, CODEX, IF; values in the hundreds to thousands): 25–50.
- MIBI: 0.05 (Hartmann et al. 2021; see References).
- Choose a value near the boundary between background and positive signal. If almost all raw values are below the cofactor, the transform changes very little. If almost all are far above it, low-intensity differences are lost.
- sqrt —
sqrt(max(0, x)). No cofactor.
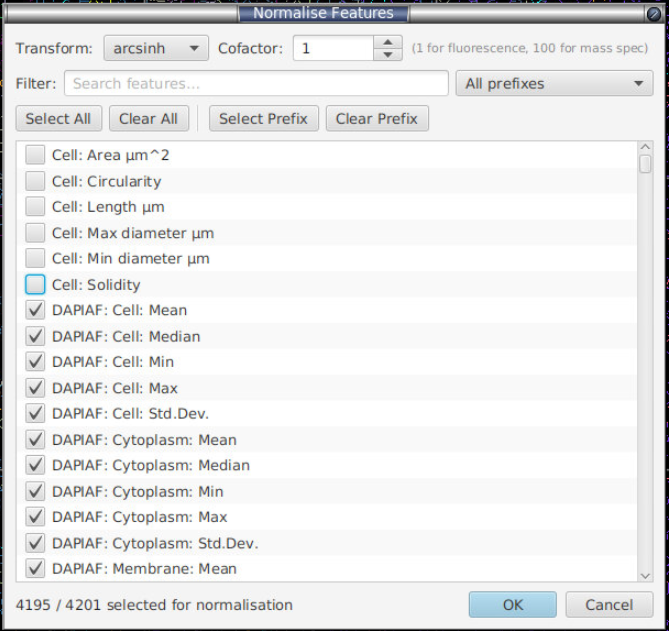
The one transform and cofactor apply to every ticked feature. Unticked features stay raw. Do not tick morphology features (e.g. Cell Area) or features that are already normalised (e.g. foundation-model embeddings).
Why use it. Clustering compares cells by distance across all markers. Without a transform, a few very bright markers decide most of the result. arcsinh reduces the effect of bright outliers and keeps differences between dim cells.
What it does not do. It does not change the classifier, auto-prune, feature importance or ground-truth export, which all use raw values. It does not correct differences in staining or exposure between slides, because the same transform is applied to every image. For that, use batch normalisation (§19) and label cells on several different slides.
What clustering does automatically. The transform in this window is optional. Every clustering run also:
- z-scores each marker (subtracts the mean and divides by the standard deviation), and
- applies PCA when more than 50 markers are selected and Reduce dims (PCA) in the scatter plot is ticked (default: ticked).
If you set no transform here, clustering runs on z-scored raw values. arcsinh adds one thing z-scoring cannot: it reduces extreme high values within a marker.
4.3 Create classes & Class Control¶
Menu: Extensions → SP Classify → Class Control...
A dialog with 4 tabs for managing QuPath's class list and the labels saved under <project>/celltune/image-labels/. The class lists reload when the dialog opens and when you switch tab.
Add tab¶
Type a class name and click Add Class. This adds the class to QuPath's class list only. Label files are not changed.
Delete tab¶
- Pick a class from the list.
- Tick Also remove labels with this class from all image-label files to remove the class's labels from every saved label file. Leave it unticked to remove the class from the class list only. The saved labels are kept on disk and are still used for training.
- Delete Selected Class (red) — asks for confirmation.
Merge tab¶
- Select one or more source classes (Ctrl/Cmd+click), then type a target name or pick one from Existing:.
- Merge Selected → Target renames every matching label in all images. The original name is kept in the saved label:
test1merged intomyTypeis saved astest1-mergedInto(myType). Training uses the target class (myType). Undo it from the Undo Merge tab. Class names must match the labels exactly, including case and a trailing*(e.g.ignore*); if no saved label uses the selected classes, a warning says that no labels were changed. The class list is still updated: the target is added and the sources are removed.
Undo Merge tab¶
- Pick a class that was a merge target. The list shows classes found in
-mergedInto(...)labels. - Undo Merge for Selected Class — restores each label to its original name and adds the original class back to the class list. The target class is not deleted. Remove it from the Delete tab if you no longer need it.
4.4 Channel mapping for review (marker table)¶
Menu: Extensions → SP Classify → Channel Mapping (Review Display)... (or Edit channel mapping… in the Review Mode window)
Optional. The channel mapping lists which image channels to show for each class. In Review Mode, the viewer then shows only those channels for the current cell. (The CSV file version is called a marker table in the Import menu.) Build it in the Channel Mapping editor. Use CSV import and export to share a channel mapping between projects or to load an existing marker table.
Open an image first: the editor lists that image's channels. Pick a class on the left, tick channels on the right, and click Save. Each class shows a status symbol for the open image (✓ exact, ≈ matched ignoring case/spacing/punctuation, ~ partial-name match only, ! some names unmatched, ✗ nothing matches, – no channels set). There is no limit on channels per class. Above 8, the editor shows a warning that the combined image may be hard to read; you can still save. For the editor's buttons (Clear / Pin matches / Preview / Import CSV… / Export CSV… / Pin all matches / Scan project channels) and the CSV formats, see Marker table format.
Simple CSV format (via Import → Marker Table... or the editor's Import CSV…):
CellType,Marker1,Marker2,Marker3
T-Cell,CD3,,
B-Cell,CD20,,
Macrophage,CD68,CD163,
Dendritic,CD11c,,
NK-Cell,CD56,,
Columns Marker1–Marker5 are read, plus any further columns whose header starts with Marker (Marker6, …). Other columns are ignored. Names are matched against the image's own channel names, ignoring case, spaces and punctuation, so CD3_S2 - Cy5_AF matches the channel CD3_S2-Cy5_AF. Channels you tick in the editor are matched by exact name first, then the same way on other images.
Fixing a CSV that picks the wrong channels: open the editor, click Import CSV…, look for ~ / ! / ✗ rows, fix the ticks, click Pin all matches, then Save.
In Review Mode:
- Auto-select channels during review (ticked by default) shows only the mapped channels for the current cell. Untick it to change channels yourself.
- Auto-adjust brightness/contrast of shown channels (unticked by default) also resets each shown channel's brightness/contrast when you move to a new cell. Leave it unticked to keep your own brightness/contrast settings. It is greyed out unless Auto-select channels during review is ticked.
Both checkboxes keep their setting across review windows and QuPath restarts. A status line below them shows which channels the current cell is displaying.
The channel mapping is saved per project, in
<project>/celltune/marker-table.json, when you click Save in the editor or import a CSV with Import → Marker Table.... It is kept after QuPath restarts. Opening a different project loads that project's channel mapping (a project without one starts empty). To reuse a channel mapping in another project, click Export CSV…, then import it in the other project. The editor's Import CSV… replaces what the editor shows and is not saved until you click Save.